Guides
How to Make Your Own Epoxy River Table
Feb
Welcome to the guide on making your own Cast Epoxy river table. The instructions below will give you the expertise to start creating a beautiful and unique table in 8 steps.
At the bottom of the page, you’ll find what you need to make a river table.
Step 1: Preparation for epoxy river table
It is very important that the environment you work in is a dry, heated space with a temperature of around 18°C throughout the entire process. The resin should also be at room temperature, so if it’s delivered cold or has been stored in the garage, you must increase the temperature to at least 18°C before use.
Humid or cold conditions affect the end result, and the space should be as dust and dirt-free as possible.
Step 2: Choosing and preparing the wood
When choosing your wood, make sure the wood is well-dried and as flat as possible. The style and type of wood is a personal choice, although interesting grains and annual rings work best for this type of project.
We’re going to cut the wood and prepare our piece of wood, but if you don’t have this equipment, you can ask your supplier to cut the wood to the right size. You can also ask them to cut the wood in half if you’re going to make a channel.
After cutting the pieces of wood in half, you need to turn them over to create the river channel and remove any bark from the edges. This allows the resin to bond with the wood and ensures the finished table is mechanically strong.
You can inquire at a nearby lumber yard or woodworker if you can use this machine there. This is often not a problem for a small fee. By doing this, it saves a lot of time by not having to sand the entire surface flat.
Step 2.1: Removing bark
Use a chisel to remove the bark and sand with sandpaper to remove any loose material, sweep away dirt or dust from the wood and use a vacuum cleaner if necessary. This is needed to make the epoxy adhere to the wood. Wipe the table with acetone or turpentine and let it evaporate completely. This is necessary before the epoxy can be applied. This ensures a grease-free base
Step 3: Measure and mix a small amount of resin and pour it into any cracks
Check after a few hours to see if it’s necessary to refill, as the wood will likely absorb some of the resin .
Add a bit more resin to the openings and then let it cure completely according to the instructions.
When the resin has fully cured, use sandpaper to level the surface, remove irregularities with a sanding machine or with sandpaper, you want to leave a textured surface, so coarse sandpaper is ideal for this.
Step 3.2: Resin ratio
The casting resin we use can be mixed according to the ratio:
100:50 | epoxy resin: epoxy hardener
This stands for 100 parts resin and 50 parts hardener. An example follows below.
If you weigh 100 grams of resin, you need to add 50 grams of hardener. So in total, you have 150 grams of casting resin.
The calculation for larger quantities is as follows:
You want to weigh 5 kilograms of resin.
- Convert the kilograms back to grams to get an accurate representation. From kilos to grams is a factor of 1000.
(5 x 1000 = 5000 Grams) - The total number of parts added to make the casting resin is 150. Divide the desired weight by these parts.
(5000 / 150 = 33.33 1 Part) - Now calculate the number of grams of resin you need by multiplying the result of step 2 by 100 parts. The answer is the number of grams of epoxy resin.
(33.33 * 100 = 3333.33 Grams - Calculate the number of grams of hardener you need. Do this by multiplying the result of step 2 by 50 parts.
(33.33 * 50 = 1666.67 Grams - Check your results. Add the outcomes of steps 3 and 4 together. With a correct calculation, the result should be 5000 grams again.
TIP: After you have mixed the resin and hardener well, pour the mixture into a second bucket and mix it again to ensure that no unmixed resin remains.
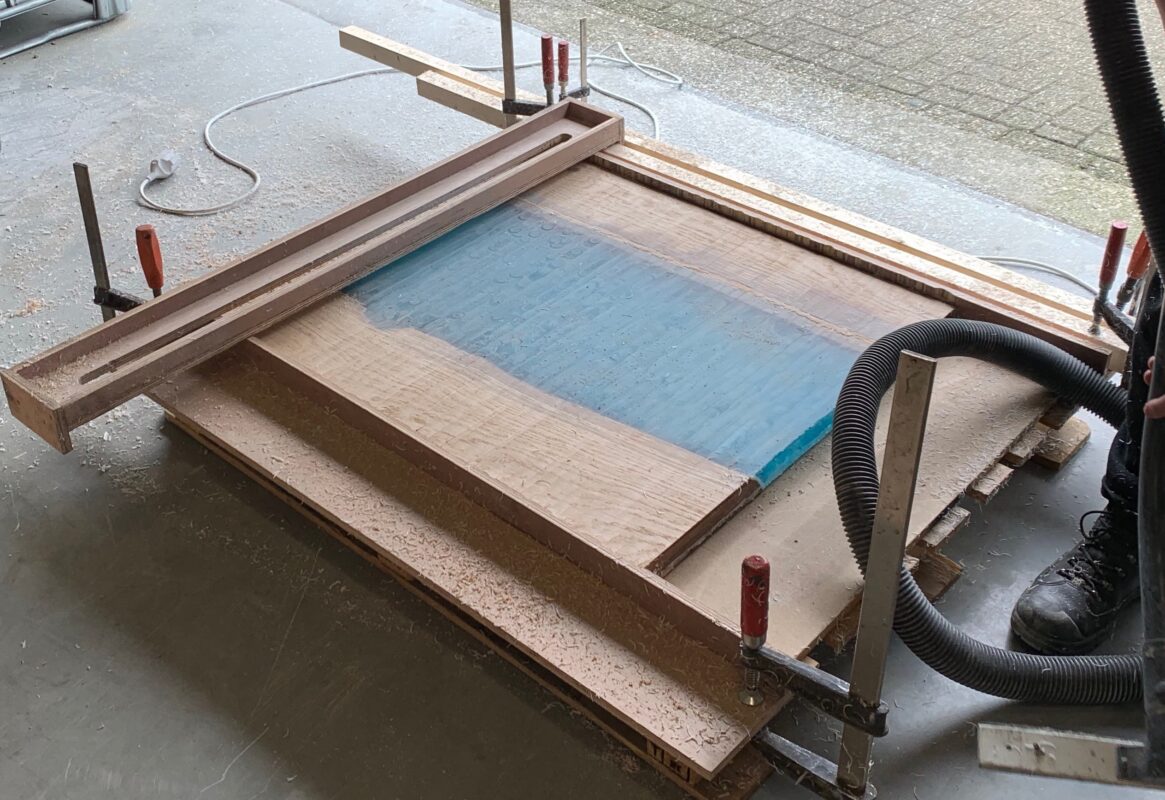
Step 4: Creating a Mold for Your River Table
Now place your wooden planks so that you can make a holder for filling the river channel, which will support the resin during pouring and curing (the river):
Use a flat plate for this, such as MDF or chipboard, which is slightly larger than the plank itself and can serve as a base to work on. You cannot pour on this yet as the epoxy will adhere to it.
Next, we used a polyethylene sheet (or PE sheet) because the resin doesn’t stick to it. This lies over the MDF or chipboard. This forms the base, after which side walls are made to create a tray from the wood, wooden plants with PE tape.
Make sure the base is about 4-5 cm larger than the size of the actual table, so that the sides can be sawn to the correct size afterwards (if necessary). Use silicone sealant to seal the tray watertight. Let this cure well to prevent leaks.

Step 4.1: TEST your mold before pouring!
Do this by, for example, letting a small amount of water run into it, making sure it’s well dried before the actual pouring.
The Thick layers of casting resin used for this process is watery thin and can therefore escape through the smallest holes.
It’s a good idea to use clamps or weights to ensure that the planks don’t float in the casting resin. Also to ensure that the planks stay in place and are as flat as possible during the pouring of the epoxy river table.
You may need something to place against the wood and clamps; we covered ours with PE tape so that it wouldn’t stick to the resin.
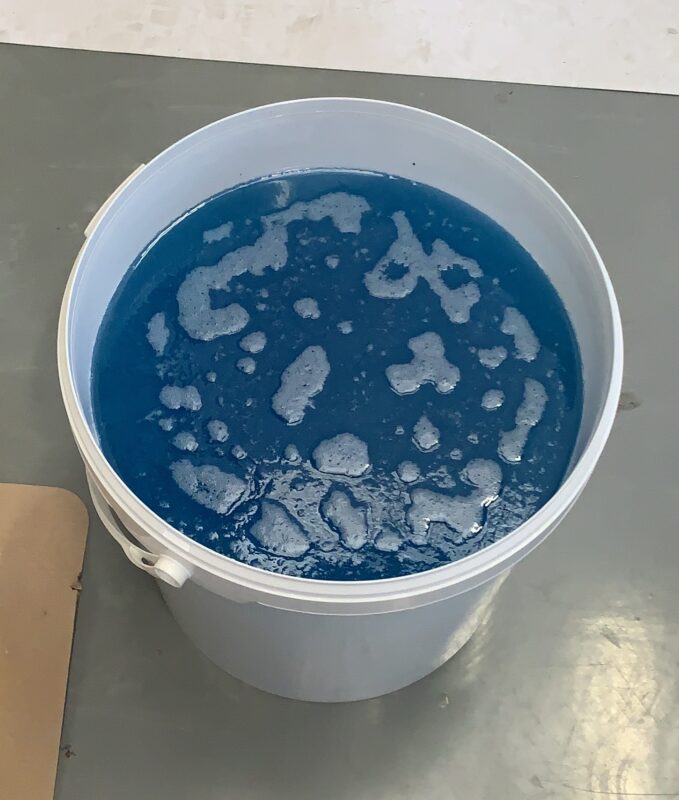
Step 5: Measuring, Adding Color, and Pouring Thick Layers of Casting Resin
Personal preference determines whether or not you want to paint or color your resin, or leave it transparent. Many people use metallic pigments, solid colors, or semi-transparent pigments from PourPoxy Pigments in their Epoxy River Table.
You can also add your own chosen objects to your river as long as they are completely dry. We recommend using the desired pigment in a small amount of resin to see what effect you get before attempting to pour your table.
Step 5.1: Coloring your epoxy river table.
We use the Blue green metallic color pigment from PourPoxy Pigments in our resin to achieve the overwhelming effect in our table.
For the use of pigments, check the addition ratio, I will come back to this later.
The resin we used is the Thick Layer Casting Resin, which can be poured to a depth of 5-7 cm in one go. Follow the instructions on the packaging and in the product description to weigh the epoxy resin, ensuring you do this accurately and consistently to guarantee quality. Add the color pigment to the resin, carefully adding drops/powder and mixing thoroughly until the desired color is achieved. Then add the correct amount of hardener to the pre-colored resin and mix thoroughly.
Do not mix more than 15 kg at a time and repeat if necessary.
Transfer the mixture to a second clean bucket and mix the contents again. This process is called double potting and ensures that any unmixed epoxy resin that may be sitting in the corners of the bucket is fully mixed.
You are now ready to prepare the resin for the base/sealing layer.
Step 6: Pour the Base Layer
We recommend first applying a primer to seal the edges of the wood, which will help minimize air bubbles during pouring. Make sure the resin covers the entire surface where you want the epoxy to adhere. Place the wooden planks back in the correct position in your mold. Using a brush, you can seal the edges and top surface with resin, including filling any knots, cracks, or gaps.
Step 6.1: Securing the River Table
Place pre-treated wood blocks within the edges of your mold. Use wood blocks wrapped with PE tape and clamp them in position. Allow the resin to cure completely. This means the resin is no longer sticky.
Touch the resin with a gloved finger, and if it doesn’t stick to the glove, the curing has progressed far enough, and you can prepare for the pouring process. It’s important to sand the primer layer well to achieve good adhesion to the new layer. Make sure to clean up your sanding residue thoroughly.

Step 7: Pouring the Epoxy River Table
Once the resin has cured on the base/sealing layer, you must prepare the resin for the river layer: Measure out resin and add the correct amount of hardener. Mix the whole thoroughly for 2 minutes, add pigments if necessary, and bring the epoxy to color. Then we transfer the whole to a 2nd bucket to mix again for 2 minutes. Let the resin rest for 15 minutes to allow most air bubbles to come to the surface as shown in the image below. You remove these air bubbles with the bubble pop spray, gas torch or heat gun before your pour.
Pour the resin into the river channel. Use a gas torch or heat gun to remove any bubbles. The thick layer epoxy casting resin degasses itself, but you can speed up the process by using the bubble pop spray, or a gas torch (always ensure you use a full and thus blue flame to prevent damaging the epoxy resin with carbon particles). Allow this layer to cure in a controlled manner.
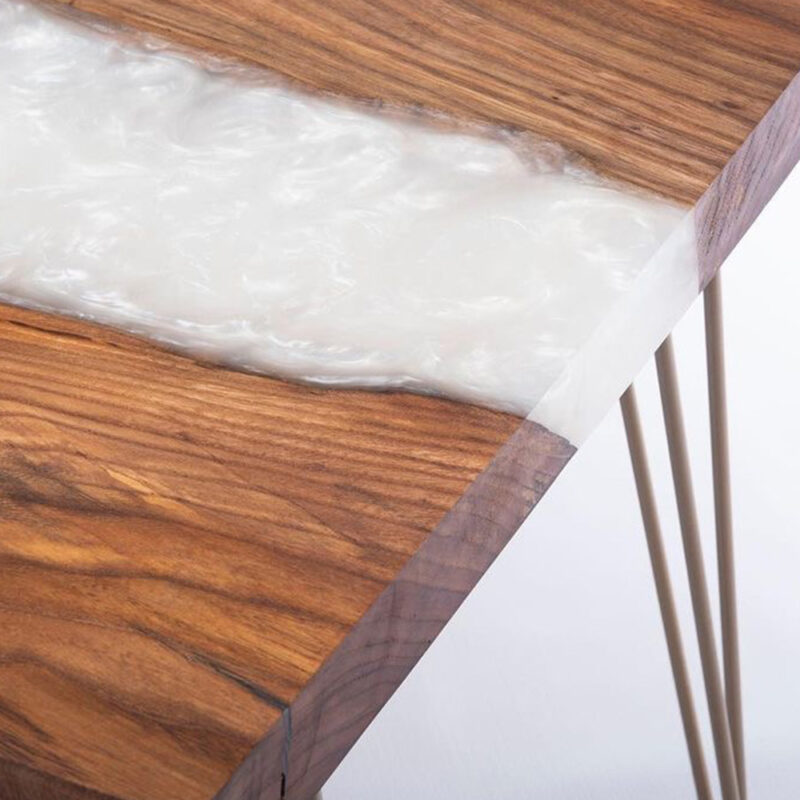
Step 8: Finishing & Sanding Epoxy River Table
To finish the table, we used a router, which we run back and forth over the board a few times to level it out. This gives you a flat and even surface. (NOTE: You should move slowly over the epoxy to prevent the epoxy from breaking.) Then you sand the surface with a centering hand sander. Because you start with a coarse sanding pad and work up to fine sandpaper, the wood gets a nice finish.
8.1 The Sanding Process Matte Finish.
For a matte finish, we need the following: grit 80, 120, 240, 320, 600, 800, and 1200 for your orbital sander. The wood is sanded up to grit 320. The epoxy is sanded up to 1200. Make sure all scratches called “pigtails” in the epoxy are gone before continuing to sand. If this is not done properly, small scratches will be visible in the final polishing and the sanding process will have to be repeated.
8.1.1 Osmo Oil
Once the entire table is sanded, it’s time to apply the desired oil that gives the epoxy river table a matte finish. You should polish this with a polishing machine for the best result. After this step, the table is sanded again with 600 grit. Then the table is oiled again. This gives the table a durable finish.

9.2 High Gloss Finish Epoxy River Table
If you want to achieve a high-gloss look, in this case, it is advised to use the table top epoxy casting resin from Pourpoxy. This casting resin is used to cover an entire tabletop to a maximum thickness of 5 mm. This provides a perfect high-gloss finishing layer.

Good luck!
Let us know if you succeeded by sending us a message or sharing your creation with the hashtag #gietepoxy on Instagram.