Guides
Creating Model Building and Dioramas with Epoxy Casting Resin.
Feb
Create Stunning Dioramas and Model Building with Resin Art Epoxy Casting Resin from Pourpoxy
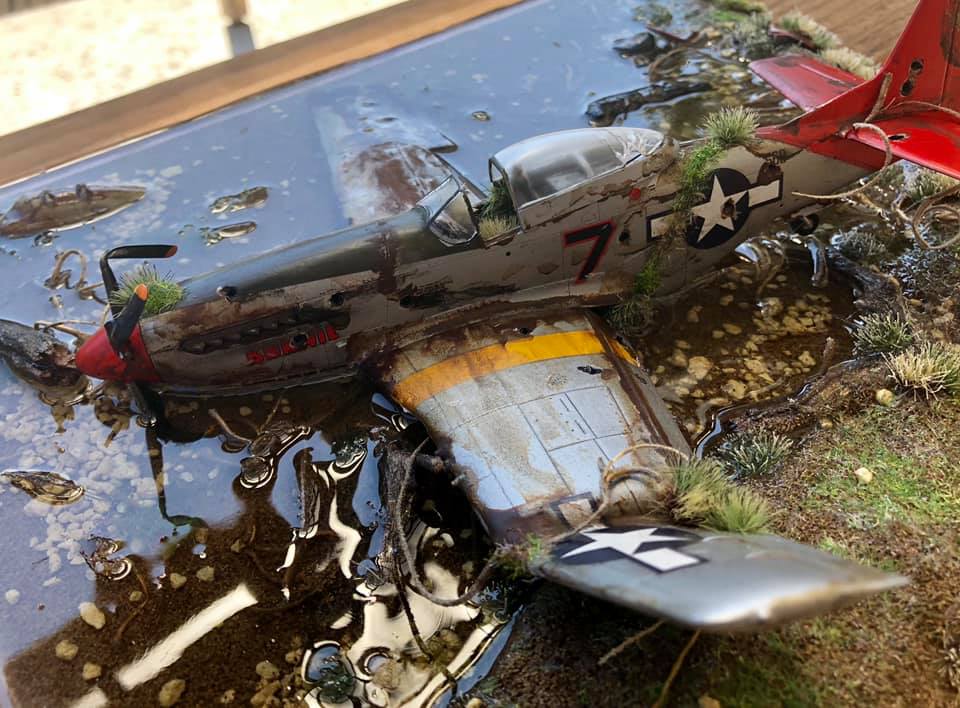
Resin art epoxy casting resin is a versatile material used not only for creating artworks but also for crafting beautiful diorama “s and detailed epoxy model building projects. With the high-quality resin art epoxy casting resin from Pourpoxy and the addition of pigments, model builders and diorama makers can create breathtaking and lifelike creations. In this article, we explore the various aspects of using Pourpoxy casting resin in combination with pigments for creating diorama” s and models.
Why Choose Pourpoxy Resin Art Epoxy Casting Resin for Your Model Building Epoxy Project?
Pourpoxy Resin Art Epoxy Casting Resin is known for its excellent clarity, durability, and ease of use. The casting resin offers a longer working time, allowing model builders and diorama makers more time to perfect their creations. Moreover, the clarity of the resin ensures a crystal-clear finish, making even the smallest details of the diorama or model clearly visible. The excellent UV stability of the casting resin ensures that the colors of the pigments are preserved, even when exposed to sunlight.
Pigments: Bring Your Diorama to Life
With pigments, you can add color and depth to your diorama or model. Pourpoxy casting resin is compatible with a wide range of pigments, including epoxy dyes, metallic powders, and transparent pigments. By adding pigments, you can create realistic landscapes such as grass, water, rocks, and more. Additionally, pigments offer the possibility to add special effects like metallic sheen, glitters, or marbling effects, bringing your diorama or model even more to life.
Step-by-Step Guide for Using Pourpoxy Resin Art Epoxy Casting Resin with Pigments
- Preparation of the Work Surface: Ensure a clean and flat work surface. Protect the surface with plastic film or a silicone mat to prevent the casting resin from sticking to the surface.
- Mixing the Casting Resin and Hardener: Follow the manufacturer’s instructions for mixing the casting resin and hardener. Make sure to follow the correct mixing ratio accurately to ensure optimal curing.
- Adding Pigments: Add the desired pigments to the mixed casting resin and mix thoroughly until the color is evenly distributed. Experiment with different pigments to achieve the desired color and effects.
- Pouring the Casting Resin: Carefully pour the mixed casting resin into the mold or onto the work surface. Work in layers if necessary to create complex details or different landscape elements.
- Removing Air Bubbles and Curing: Use a heat gun or the bubble pop spray to remove any air bubbles. Then allow the casting resin to cure according to the manufacturer’s instructions.
- Finishing and Detailing: After the casting resin has fully cured, you can further refine and detail the diorama or model. Add extra elements such as trees, figures, or buildings to bring your creation to life.
Final Result: A Masterpiece of Realism and Creativity
With Pourpoxy Resin Art Epoxy Casting Resin and pigments, you can create stunning dioramas and detailed models that stand the test of time. By combining high-quality materials with craftsmanship and creativity, you can create unique and impressive creations that will inspire admiration in others. Let your imagination run wild and discover the limitless possibilities of resin art in the world of dioramas and epoxy model building projects.

Water Created with Pourpoxy Resin Art Epoxy Casting Resin. Strikingly Realistic.