Guides
Creating an Epoxy Coin Floor with Casting Resin
May
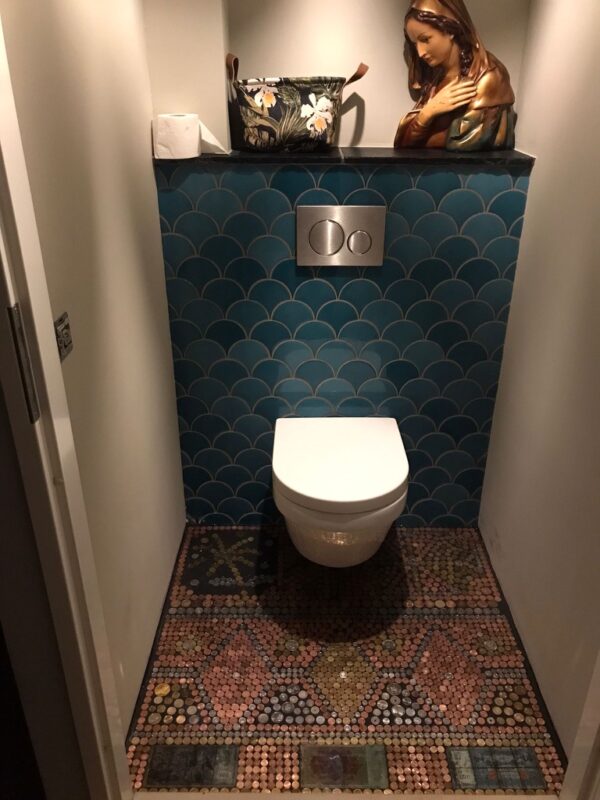
A coin floor is a unique and fun way to decorate a space, especially for those who love a bit of bling. It can be made using the tabletop epoxy casting resin and coins of various sizes and materials. It can add a creative and personal touch to any room, whether it’s a bathroom, kitchen, toilet, or even a bedroom. Below you’ll find a step-by-step guide on how to create a coin floor with epoxy casting resin.
What do you need?
- Coins
- transparent adhesive kit
- Epoxy casting resin depending on the thickness, either the Tabletop epoxy casting resin or the universal epoxy casting resin.
- Gloves and a half-face mask
- Measuring cup
- stirring stick
- scale
Step 1: Prepare the Surface
Before you start pouring the epoxy casting resin, it’s important to ensure that the surface is prepared. This means the floor should be clean, dry, and free of dirt and dust. Also make sure there are no cracks, holes, or other damage that could affect the adhesion of the epoxy casting resin. If repairs are needed, make sure they are done before proceeding.
Step 2: Collect Coins
Collect coins of different sizes and materials. The coins can be made of copper, silver, bronze, or other materials. It’s important to check that the coins are not coated with a protective layer, as this layer may affect the adhesion of the epoxy casting resin. It’s also a good idea to collect more coins than you need, in case some don’t fit or don’t look good together.
Step 3: Clean the Coins
It’s important to clean the coins thoroughly before placing them on the floor. This can be done using a soft brush and some water and soap. Make sure to remove all dirt, dust, and fingerprints from the coins.
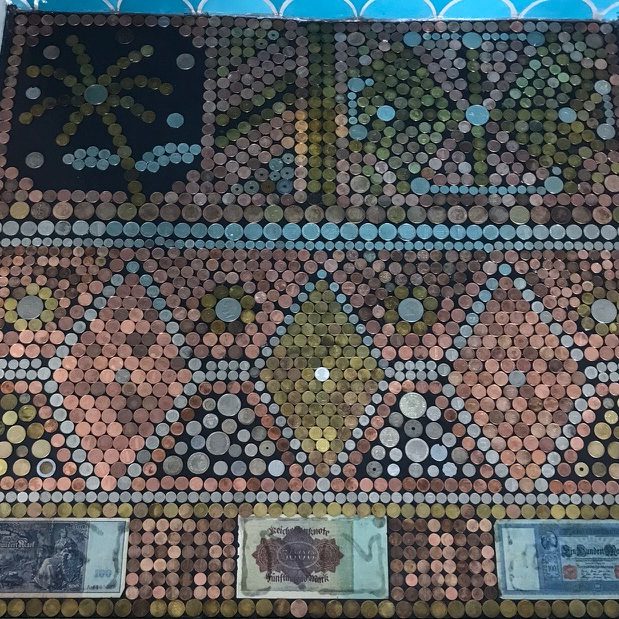
Step 4: Arrange the Coins
Start arranging the coins on the floor. This can be done in various ways, depending on the desired design. Some people choose to place the coins randomly, while others create a pattern or image. It’s important to experiment with different layouts before gluing the coins down.
Step 5: Glue Down the Coins for Your Epoxy Coin Floor
Once you’re satisfied with the layout of the coins for your epoxy coin floor, it’s time to glue them down. Use a strong and durable adhesive that is suitable for both metal and the surface. Apply the glue to the back of the coins and carefully place them in position. It’s important to press the coins down firmly and ensure they lie completely flat on the surface.
Step 6: Prepare the Epoxy Casting Resin
on the packaging of the epoxy resin to prepare it. The mixing of the epoxy resin can vary depending on the brand and type of resin you have chosen. It is important to use the correct proportions and ensure that the resin is well mixed before pouring. You can use the mixing ratios tool to ensure you always weigh correctly.
Step 7: Pour Epoxy Resin Over the Coin Floor
Pour the epoxy resin slowly and evenly over the coins, starting from the center of the floor and working towards the edges. Choose to use a putty knife or a spatula to carefully spread the resin and ensure it is evenly distributed over the coins. Make sure the resin fully covers the edges of the coins and that no air bubbles remain.
Step 8: Allow the Epoxy Resin to Cure
Allow the epoxy resin to cure according to the instructions on the packaging. This can take several hours to several days, depending on the ambient temperature and the thickness of the resin layer. Ensure that the space where you have poured the floor is well-ventilated during the curing process.
Make sure to follow all safety instructions when working with epoxy resin and wear gloves and use a half-face mask to protect yourself. Good luck!
With these simple steps, you can create a unique and attractive epoxy coin floor using epoxy resin. It’s a fun and creative way to decorate a room and can be a real eye-catcher.